Setting up Printers with Standard Visitor Labels
The following guide covers how to set up a supported printer with standard-sized sticker labels ( 2-5/16″ X 4″).
Note: This guide does not apply to the ‘Thermal Tape’ paper type. There are no changes to the thermal paper. Also, make sure the new visitor labels are loaded into the printer prior to setup.
Verify App Version
- In the client app, click ‘show app info’ at the center-bottom of the page.
- Ensure it is v1.27.1 or later to support standard labels. If your version is outdated, perform a hard-reload by pressing the Shift key and F5 key simultaneously.
Verify Client Agent Version
- In a new browser tab, go to: https://localhost:4004
- Ensure the page displays the correct version number: v1.3.6 or later. If your version is outdated, follow the ‘Manually Reinstall Client Agent’ section below for step-by-step instructions.
If the page is not loading, you will need to configure a new Client Agent. To do so, follow the ‘Steps to Configure a New Client Agent’ from the following link here.
Install and Configure Printer
- In the Client app, click on the hamburger menu in the top-left corner, then click ‘Settings’. Note: If you don’t see a ‘Settings’ option, you may need to log in as an administrator and click ‘Switch to Admin Mode’.
- From the Settings page, click ‘Devices’.
- Select your current printer, or if needed, click ‘Add New Device’ and select your printer from the menu.
Note: Select ‘Generic Printer’ if you have either an iDPRT or a Centegix L3 printer.
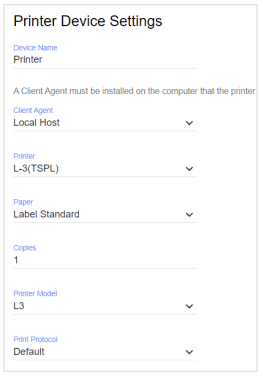
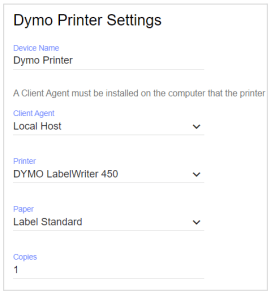
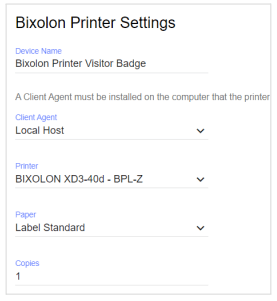
- Configure your printer according to printer type. Ensure you select ‘Label Standard’ for the ‘Paper’ dropdown.
Centegix L3
iDPRT

DYMO
BIXOLON
5. Once finished, click ‘Save’ and click ‘Test Printer’ to ensure successful printing.
Manually Reinstall Client Agent
- In the Windows search bar, type ‘Services’ and run the app as administrator.
- Stop the following two services:
‘CCSSVM Client Agent’
‘CCSSVM Client Agent Updater’
- Navigate to the C:\ drive and delete the ‘ccssvmclientagent’ folder.
- In the Windows search bar, type ‘Add or Remove Programs’. Open the first result.
- Uninstall ‘CCSSVM Client Agent’.
- Now, follow the ‘Steps to Configure a New Client Agent’ from the following link here.